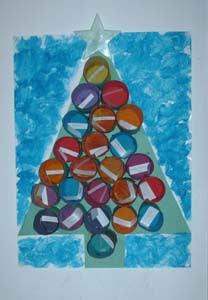
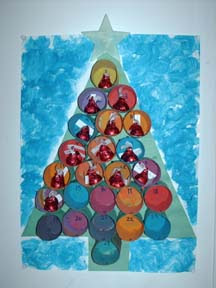
This year we added an Advent calendar to our activities. I didn’t want to spend money on one so we made one. I found the idea online, and then I modified it to fit in with our needs.
Making your own Advent Calendar with items you already have in your home!
Collect:
- 12 toilet paper rolls (or 6 paper towel tubes, or any combination thereof.)
- Green construction paper.
- Poster paints.
- A large piece of cardboard, poster board, or thick finger painting paper.
- a ruler
- an exacto knife, box blade, or any other kind of straight blade
- scissors
- hot glue
- glue stick
- permanent marker
- paintbrushes
- newspaper
- old shirts or painting smocks
- clothespins
- 24 small strips of paper
- candy (24 for each child)
Step 1:
After covering the table with the newspaper and donning the painting smocks, measure and mark the tubes in two-inch segments. Using the exacto knife or box knife, carefully cut the segments apart to make a total of 24 2-inch tubes. Using the clothespins to hold onto the tubes, paint the outsides of each tube green and set aside to dry.
We had a system going where I cut the tubes and set them in a stack as they picked them up and painted them while I cut more tubes. That kept them from getting too fidgety while I cut, and kept them from trying to help me.
Step 2:
While the tubes dry, cut out a Christmas tree shape in green colored construction paper that measures approximately 12 X 16 inches. You can use one large piece, or piece it together with two smaller pieces. Using a glue stick, glue the tree onto your posterboard.
While I measured and cut the Christmas tree, I sent the girls to wash their hands, because even with the clothespins, they still got quite messy.
Step 3:
After the tubes are dry, they need to be hot glued onto the paper. Be sure to arrange your tubes on the tree first to make sure they fit and to have a good idea where they need to go. You could trace inside each circle with a pencil to assure proper placement. Starting at the top of the tree, glue the bottom edge of the first tube on. Taking the second tube, apply glue to the bottom and one line down the side to glue it also to the first tube. Repeat so that all the tubes are glued to the paper and to each other.
During this step, I set the girls down with a snack to keep them patient while I used the hot glue gun.
Step 4:
After donning the smocks again, paint the inside of each tube (and the green paper as well, if desired) different colors to represent ornaments. If desired, paint the area around the Christmas tree on the poster board. Otherwise, you can leave it blank to trim it off.
Again, I sent the girls to wash their hands and change their clothes while this step finished drying.
Step 5:
Once the paint is dry, use the permanent marker and number the inside edge of each tube from 1-24, starting at the bottom (for the days of the month.) Then number the construction paper at the back of the tube from 1-24 starting at the top (for the number of days remaining until Christmas day.)
On each strip of paper, write an activity to do for each day. Have the kids help make suggestions. Some ideas are: putting up the Christmas tree, decorating the Christmas tree, putting up the wreath, etc.; making Christmas cards, do a Christmas ornament craft, etc.; reading a Chr
istmas storybook or listening to Christmas music; and drinking hot chocolate or baking Christmas cookies. Some of these you can repeat a few times. Have fun with it. Place one strip inside each tube, paying attention to place specific ones on specific days where you want them. And lastly, add the candy! The final result:
We used Hershey’s kisses filled with cherry cordial creme — MMmmm… those are too good!
Step 7:
Now you are free to hang or display your Advent calendar wherever you want. Each day, pull out the activity and the treat. The date at the bottom helps the kids keep track of what day it is and makes sure no little 3 year olds sneak any extra candies. Well, at least not get away with it anyway! The countdown at the back helps the kids keep track of how many days are left after they pull the treats out.
My kids like their Advent Calendar. They are happy to show it off, since they helped make it, and they are excited each morning to run and see what the activity for the day is and get their small treat. This is just one more way that we try to build the excitement in anticipation of celebrating Jesus’ birth on Christmas morning. It’s working well so far, and I’m sure we’ll end up doing it again next year!


Thanks for sharing the ideas! Im a new home school mom and its nice to get ideas from other moms out there!
Thank you for such a wonderful idea! I am going to make this for my 3 year old and take it a step further by gluing a bit of tissue paper over the hole, so she can get a kick out of tearing the paper away!